Structured Reading View
The guide below is rendered from the CMS-managed tutorial content and kept aligned with the public landing page design so schools can publish a cleaner onboarding page.
Back to top
1. System Scope
The main modules available to users are:
- Public access and authentication
- Internal user dashboard
- User profile and task notifications
- Members & Users (CRM)
- Projects & Activities (Project Proposals)
- Finance
- Contributions (Payments / Donations)
- Parent Payment Portal
- Settings and User Management
In general, access to each module depends on the user's role and permissions. Not every menu is visible to every user.
2. User Roles In The System
The system supports the following roles:
- System Admin
- YDP
- Principal or Headmaster
- Assistant Principal or Senior Assistant
- Secretary
- Treasurer
- PIBG Committee Member
- Senior Teacher
- Teacher
- Parent
These roles affect the dashboard, visible menus, assigned tasks, and available actions in the project, finance, and data management modules.
3. Public Access And Login
3.1 Public Pages
Public users can access:
- The main landing page
- The Privacy Policy page
- The Refund Policy page
- The login page
- The parent account registration page
3.2 User Login
Internal users and parents can sign in through the login page. After a successful login, users are taken to the appropriate workspace based on their account and access rights.
3.3 Parent Registration
The system provides a public parent registration form.
The basic registration flow is:
- The parent enters full name, email, password, and phone number.
- The system checks whether the email already exists.
- If the account does not exist, the system creates a new user and assigns the user to the `ibubapa` group.
- The system creates or updates the parent record in the database.
- The registered account can then be used to access the parent portal.
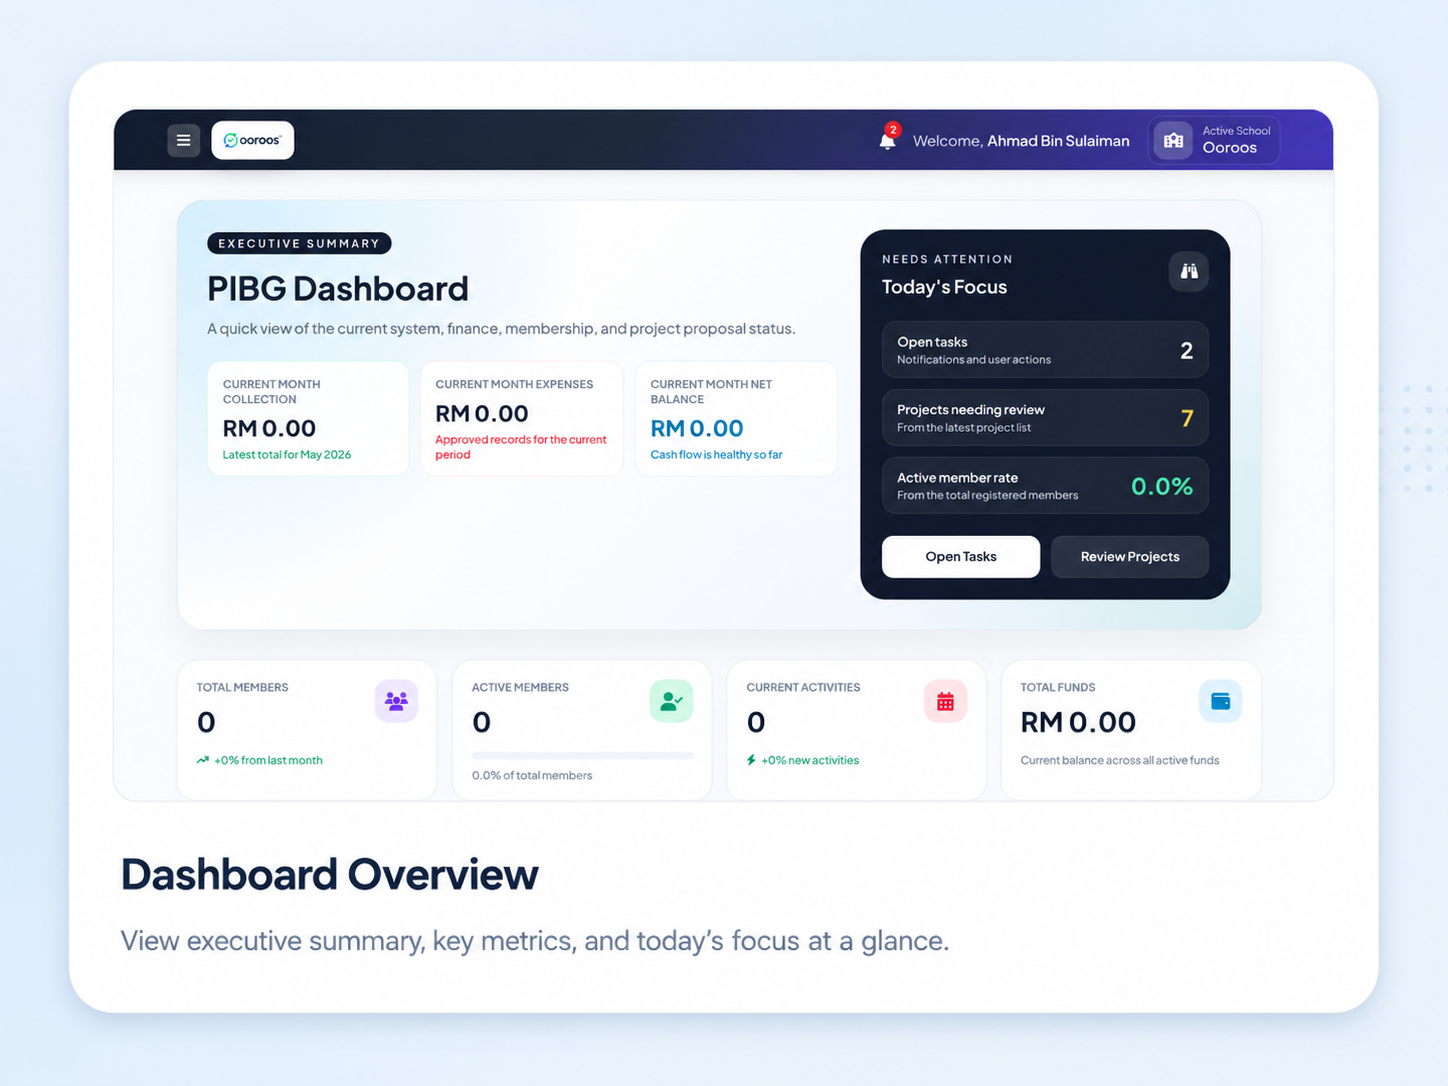
4. Internal User Dashboard
After logging into the admin area, the dashboard becomes the main navigation center. Based on the current system menu, the dashboard usually includes:
- Dashboard
- ooroos Finance
- ooroos Contributions
- ooroos Members & Users
- ooroos Projects & Activities
- ooroos Settings
- User Management
- Notifications
- User Profile
The dashboard works as a daily operations hub. It allows users to jump directly into the modules that match their responsibilities.
5. User Profile And Notifications
5.1 User Profile
Every logged-in user can manage their own profile. The profile module includes:
- Update full name
- Update email
- Update phone number
- Update address
- Update occupation or position
- Change password
- Review current account information
For selected administrators, the system also provides the ability to edit other users' profiles through the user management workflow.
5.2 Notifications / Tasks
The system includes an internal task and notification module. Its main functions are:
- View pending tasks that require action
- Mark tasks as completed
- Dismiss notifications that are no longer relevant
- View the pending task count
- View the most recent tasks
These notifications are especially important for project review, committee voting, and finance verification processes.
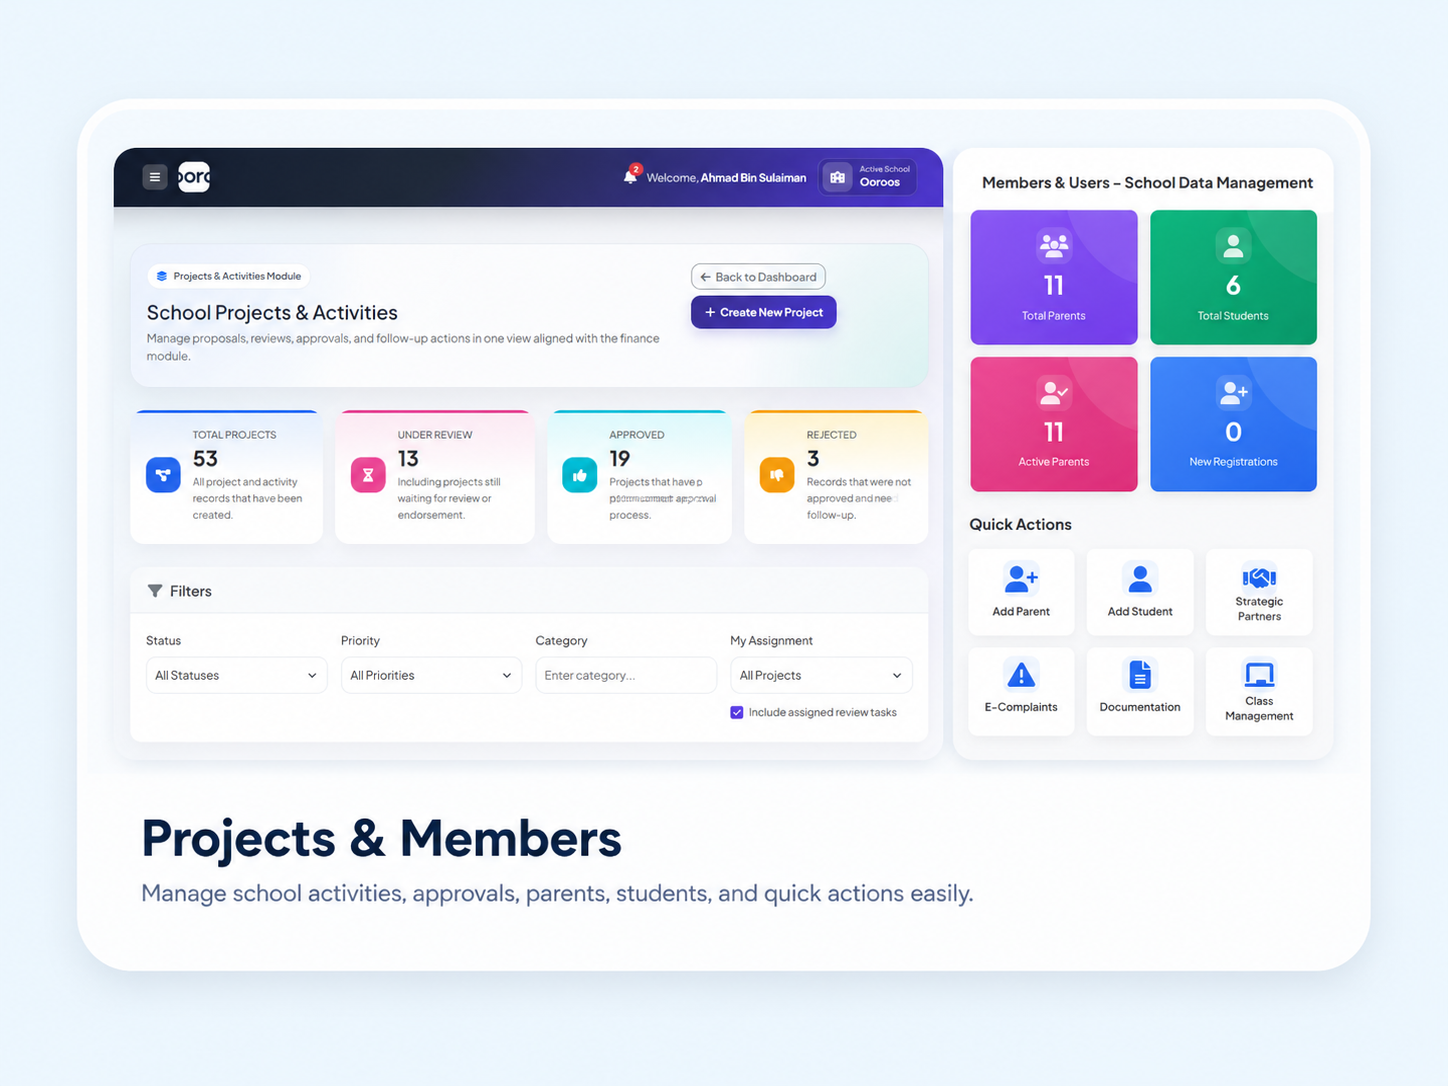
6. Members & Users
This module is the main hub for managing school-related and PIBG-related records. In the current user interface, it is labeled `Members & Users`.
6.1 CRM Dashboard
The CRM dashboard displays summary statistics and quick links for:
- Parents
- Students
- Teachers
- Classes
- E-Complaints
- Documentation
- Strategic Partners
6.2 Parent Management
Available functions:
- View the parent list
- Add a parent
- Edit parent information
- View a parent profile
- Delete a parent record
- Export parent data
The system also supports linking one parent to more than one child.
6.3 Student Management
Available functions:
- View the student list
- Add a student
- Edit student information
- View a student profile
- Delete a student record
- Export student data
Student records can be linked to parent records for payment and school record purposes.
6.4 Teacher Management
Available functions:
- View the teacher list
- Add a teacher
- Edit teacher information
- View a teacher profile
- Delete a teacher record
- Export teacher data
- Import teacher data via Excel
- Generate teacher reports
Within the teacher views, administrators with the appropriate permissions can also:
- Activate teacher portal access
- Deactivate teacher portal access
6.5 Class Management
The system provides standard class management to organize students by class.
Available functions:
- View the class list
- Add a class
- Update a class
- Delete a class
6.6 E-Complaints
The complaint module allows the organization to manage complaints digitally.
Available functions:
- View the complaint list
- Add a complaint
- View complaint details
- Edit a complaint
- Update complaint status
- Export complaints
Complaint statuses help the administration track follow-up actions and resolutions.
6.7 Documentation
The documentation module is used to store document references or documentation links.
Available functions:
- View the document list
- Add a document
- Edit a document
- View document details
- Delete a document
6.8 Strategic Partners
This module is used to manage data related to school or PIBG strategic partners.
Available functions:
- View the strategic partner list
- Add a strategic partner
- Edit strategic partner information
- View a strategic partner profile
- Delete a strategic partner record
6.9 Import, Export, And Templates
The Members & Users module also provides bulk data operations such as:
- Excel import for parents, teachers, and students
- Downloading import templates
- Exporting data by module type
Current import support is specifically available for parents, teachers, and students.
7. Projects & Activities
This module covers project proposals and activity management. On the dashboard, this module is labeled `ooroos Projects & Activities`.
7.1 Core Project Functions
Available functions:
- View the project dashboard and project list
- Create a new project
- View project details
- Edit a project
- Delete a project in selected statuses
- Submit a project into the workflow
- Add project comments
- Download supporting files
- View supporting files
- Remove supporting files
- View project reports
- Export project reports
7.2 Project Creation Methods
Operationally, a project can begin through at least two approaches:
- Create from scratch
- Submit using already prepared supporting documents
These approaches affect the starting status and the following review route.
7.3 Project Workflow
Based on the active controller and routes, the current project workflow is:
- `created`
- `awaiting_review`
- `principal_endorsement`
- `awaiting_ydp_decision`
- `committee_voting` or `ajk_voting` or `pibg_voting`, depending on the path in use
- `approved`
- `pending_disbursement`
- `disbursement_complete`
The `rejected` status also exists when a review or decision does not approve the proposal.
7.4 Role-Based Responsibilities In Projects
#### Project Proposer
The proposer typically will:
- Create the project proposal
- Select the related fund or funding source
- Upload supporting documents
- Submit the project for review
- Check comments and current status
- Make revisions if needed
#### Reviewer
The system supports dynamic reviewer assignment.
Reviewer functions include:
- Set project reviewers
- Review projects according to the assigned reviewer sequence
- Approve or reject the reviewer stage
#### Principal Or Headmaster
The main function at this stage is:
- Endorse the project after reviewer stages are completed
#### YDP
The YDP has key decision-making functions:
- Approve the project directly
- Reject the project directly
- Send the project to PIBG committee voting
#### PIBG Committee Members
If the project requires voting, committee members can:
- Open the project voting screen
- Cast votes on the project proposal
The system tracks eligible voters and voting status. A two-thirds voting threshold is also used in the current workflow.
#### Treasurer / Finance Users
After a project is approved, it moves into the disbursement stage.
Related functions include:
- Review projects in `pending_disbursement` status
- Verify project disbursement
- Connect project funding to the finance module
7.5 Project Documents And Comments
The system supports supporting-file management inside each project. Users can:
- Download project documents
- View documents in the browser when supported
- Remove specific files
- Run cleanup for missing file records
Project comments provide internal communication throughout the approval flow.
8. Finance
The finance module is one of the largest modules in the system. It manages fund structures, expenses, reports, and project disbursements.
8.1 Finance Dashboard
The finance dashboard provides an overview of current financial performance and status.
8.2 Multi-Level Fund Structure
The finance system is built on a three-level structure:
- Parent Fund
- Sub Fund
- Fund Component
8.3 Parent Funds
Available functions:
- View the parent fund list
- Add a parent fund
- Edit a parent fund
- View parent fund details
- Delete a parent fund
8.4 Sub Funds
Available functions:
- View the sub fund list
- Add a sub fund
- Edit a sub fund
- View sub fund details
- Delete a sub fund
8.5 Fund Components
Available functions:
- View the fund component list
- Add a fund component
- Edit a fund component
- View fund component details
- Delete a fund component
8.6 Expenses
Available functions:
- View the expense list
- Create a new expense
- Edit an expense
- View expense details
- Delete an expense
- Approve an expense
- Reject an expense
This module is suitable for treasurers or users responsible for expense records and finance review.
8.7 Finance Approval
In addition to the expense listing, the system also has a dedicated approval screen for pending expenses.
Available functions:
- View the approval list
- Approve an expense
- Reject an expense
8.8 Reports And Export
Available finance reporting functions include:
- General finance reports
- Detailed reports
- Excel export
- PDF export
- Excel import
- Downloading import templates
8.9 Fiscal Year Management
The system provides fiscal year management, including:
- View fiscal year records
- Create a new fiscal year
- View fiscal year details
- Edit a fiscal year
- Activate a fiscal year
- Delete a fiscal year
- Run fiscal year transition
- Transfer balances
8.10 Project Disbursements
Finance is also connected to the project module.
Available functions:
- View the project disbursement list
- Create a disbursement
- Verify a disbursement
This completes the flow for approved projects so that funding can be recorded and deducted from the selected fund.
9. Contributions
This module manages payment settings, contribution transactions, payment verification, and receipts.
9.1 Payment Settings
Available functions:
- View the payment settings list
- Create a new payment setting
- Save a payment setting
- Edit a payment setting
- Update a payment setting
- Delete a payment setting
These settings are typically used to define contribution types, fees, amounts, and active status.
9.2 Payment Transactions
Available functions:
- View all transactions
- View pending transactions
- View transaction details
- Verify a transaction
- Reject a transaction
- Record a manual payment
9.3 Reports And Receipts
This module also provides:
- Daily reports
- Monthly reports
- Reports by payment type
- Outstanding payment reports
- Payment summaries
- Exporting all payment data
- Downloading receipts
10. Parent Payment Portal
This portal is specifically for logged-in parents.
10.1 Parent Payment Dashboard
Inside this portal, parents can view:
- Active payment items
- Children linked to the account
- Payment transaction history
- Payment summaries
- The current payment cart
10.2 Making Payments
The main parent functions include:
- Select a payment for a specific child
- Add payment items to the cart
- Open the individual payment form
- Submit payment proof
- View transaction details
- Download receipts
10.3 Payment Cart
The system allows a single payment proof to cover multiple items through the cart.
Cart functions include:
- View cart items
- Remove an item from the cart
- Submit all cart items at once
10.4 Verification And Records
After a parent submits a payment:
- The transaction is recorded in the system
- An administrator or treasurer can review and verify it
- A receipt can be generated after processing is completed
11. Settings
The settings module is used by internal users who have configuration access.
Available functions:
- View the main settings page
- View roles
- View permissions
- Create a new role
- Save permission configuration
- View system information
- Run backup
- Update school profile settings
- Update portal onboarding email settings
- Update SEO and tracking tag settings
- Edit the public landing page
In practice, this module allows school administrators to manage organization-level settings without entering any superadmin functions.
12. User Management
User Management is different from CRM. This module focuses on portal access, permissions, and roles for existing users.
Available functions:
- View the user list
- Edit user permissions
- Update user permissions
- Edit roles
- Update roles
- Activate parent portal access
- Deactivate parent portal access
- Batch activate or deactivate parent access
- Activate teacher portal access
- Deactivate teacher portal access
- Batch activate or deactivate teacher access
This module is suitable for administrators who control who can log in and which modules each user can access.
13. Suggested Tutorial Structure By User Type
To prepare a full user manual, the content can be split into role-based step-by-step guides like this:
13.1 Parents
Recommended tutorial steps:
- Open the parent registration page and create an account using full name, email, password, and phone number.
- Log in to the parent portal using the registered email and password.
- Confirm that the parent profile is correct and review the linked child or children shown in the portal.
- Open the contribution or payment section and review the available fee items, contribution categories, or outstanding balances.
- Select the contribution that needs to be paid and check the amount before proceeding.
- Make the payment based on the school or PIBG instruction.
- Upload payment proof through the parent portal if manual verification is required.
- Return to the payment history or contribution status page to check whether the payment is pending, approved, or rejected.
- Download or review the receipt once the payment has been verified by the administrator or finance user.
13.2 Teachers And School Staff
Recommended tutorial steps:
- Log in to the internal user portal with the staff account provided by the school or administrator.
- Review the dashboard to understand the modules and menus available for the current role.
- Open the user profile page and update personal information such as phone number, address, or password if needed.
- Check the notifications or task area to see pending reviews, assigned actions, or project-related reminders.
- Open the Members & Users module if access is provided and use the allowed menus such as parent, student, teacher, class, or documentation management.
- Open the Projects & Activities module when assigned to submit, review, or comment on a proposal.
- Read the project details carefully, add comments or recommendations if required, and submit the review based on the assigned responsibility.
- Return to the dashboard or project list to monitor the updated status of the reviewed item.
13.3 PIBG Committee, YDP, Principal, And Senior Assistants
Recommended tutorial steps:
- Log in and open the Projects & Activities module from the dashboard menu.
- Filter or open the proposal list to find submissions that require review, endorsement, approval, or voting.
- Open a proposal and review the objectives, budget, dates, supporting documents, and previous comments.
- Add feedback, recommendation, or revision notes if the proposal needs amendment before approval.
- Record the decision according to the role, such as endorse, approve, reject, or return for revision.
- If the workflow includes committee voting, open the voting interface and submit the vote according to the meeting or review outcome.
- Reopen the proposal record to confirm the final status, approval trail, comments, and latest decision.
- Use the project listing or dashboard summaries to monitor which proposals are still pending and which ones are completed.
13.4 Treasurers And Finance Users
Recommended tutorial steps:
- Log in and open the Finance module from the dashboard.
- Review the fund structure, available accounts, or fund categories before recording any transaction.
- Open the expense section to add, review, or update expense records together with the required supporting information.
- Check pending expense submissions and approve or reject them based on the finance workflow and supporting evidence.
- Open the contribution or payment verification section to review submitted payment proofs from parents or contributors.
- Verify each payment and update the status so the contribution record and receipt status are accurate.
- Open the project disbursement section when project funds need to be checked, released, or validated.
- Generate the required finance summaries, receipts, or reports for school and PIBG reference.
13.5 School Administrators
Recommended tutorial steps:
- Log in as an administrator and review the main dashboard to monitor project, finance, contribution, and CRM activity.
- Open User Management to create users, update user details, assign roles, and control module access permissions.
- Open the Settings module to review school-level configuration, profile details, and any system-wide setup available to administrators.
- Update the public-facing content where required, such as the landing page, tutorial page, onboarding email content, or tracking settings.
- Review the Members & Users, Projects & Activities, Finance, and Contributions modules regularly to ensure operational data is complete and current.
- Use notifications, reports, and dashboard summaries to follow up on pending approvals, payment verification, user issues, or incomplete records.
- Periodically check that the right users can access the right modules and that inactive or outdated access is cleaned up.
15. Summary For Full Manual Preparation
If the next goal is to prepare a full user manual, the most practical structure is:
- System introduction and user roles
- Login and dashboard navigation
- Module-by-module guidance
- Role-based guidance
- Frequently asked questions such as checking project status, checking payment status, and changing passwords
This document is suitable as a master reference for writing a more detailed user manual with screenshots in the next phase.